
Saturday, 26 December 2009
Mermaid trousers
Almost overlooked these, two little pairs of trousers from Ottobre 01/03, #5. One each for the Baby and the Niece made from the leftovers from the Princess' nightie fest a few weeks ago.
Ooga Booga!
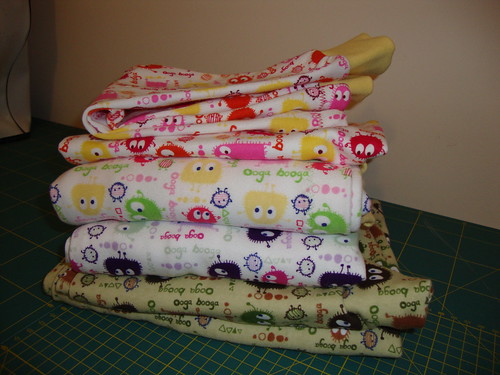
With the arrival last year of the Baby and the Niece I decided to start making Christmas Eve pj's for all of the kids. I have always loved the Ooga Booga pattern so when a big box of co-op fabric arrived a few weeks ago with four different colourways inside I knew just what to do with it. The girls got to pick which colour they wanted and the Boy was pretty much stuck with the Camo but he didn't complain. I used Ottobre patterns for all of these, thanks to my obsession with keeping old tracings I had everything I needed already filed away so they were very quick to get done.
These were for the Baby and the Niece, the pattern for the tops are 03/04 #1 on the left and 01/08 #10 on the left. The trousers are both 01/03 #5 with a tiny alteration, I cut them two inches short and added a two inch cuff so they looked more like pj's - why is it they're just not pj trousers unless they have a cuff? It never bothers me with RTW but handmade must have a cuff or they look wrong lol! This is my favourite colourway, I had two yards from which I have squeezed the pj's and a Farbenmix Olivia dress with enough large scraps left for decent appliques.
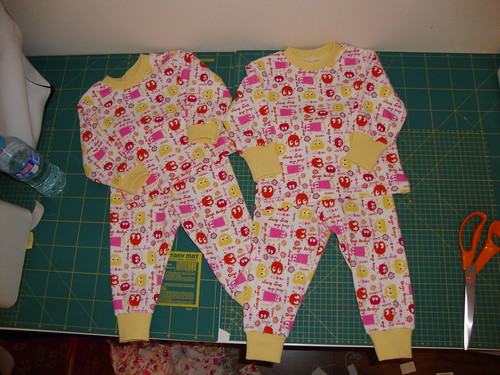
The Princess and the Monkey got more nighties from 06/09, they're not into pj's just now. Again I didn't bother flatlocking the seams, I don't really like the look.
The Boy had the Rudolf pj pattern from 06/09, #37 in a 134cm. They looked absolutely enormous while cutting out, how on Earth did my Boy get to be so big without me noticing???

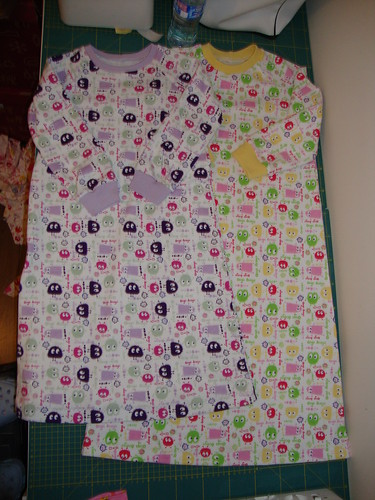
Here they are all piled up ready to wrap, those little monsters are just so cute!
These were for the Baby and the Niece, the pattern for the tops are 03/04 #1 on the left and 01/08 #10 on the left. The trousers are both 01/03 #5 with a tiny alteration, I cut them two inches short and added a two inch cuff so they looked more like pj's - why is it they're just not pj trousers unless they have a cuff? It never bothers me with RTW but handmade must have a cuff or they look wrong lol! This is my favourite colourway, I had two yards from which I have squeezed the pj's and a Farbenmix Olivia dress with enough large scraps left for decent appliques.
The Princess and the Monkey got more nighties from 06/09, they're not into pj's just now. Again I didn't bother flatlocking the seams, I don't really like the look.
The Boy had the Rudolf pj pattern from 06/09, #37 in a 134cm. They looked absolutely enormous while cutting out, how on Earth did my Boy get to be so big without me noticing???
Here they are all piled up ready to wrap, those little monsters are just so cute!
Baby Rails and Bright Stripes
I finally got these finished about a week ago and hubby has given them to their new homes, they were very well received. Here is the Baby Rails pattern:
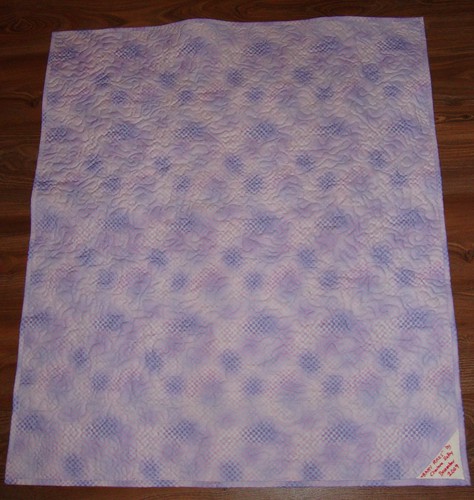
I quilted it with an all over stipple, took ages!! It's backed and bound with a Robert Kaufman cotton I've had in my stash for a very long time, a pretty lavender shaded check.
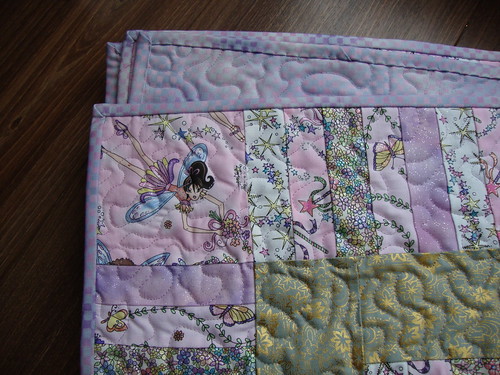
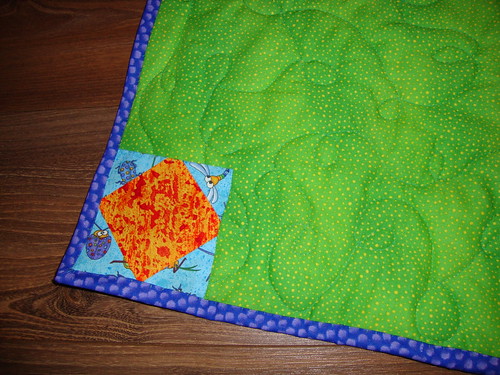
And here is a close up of my favourite of the fussy cut fairies I put at the corners.
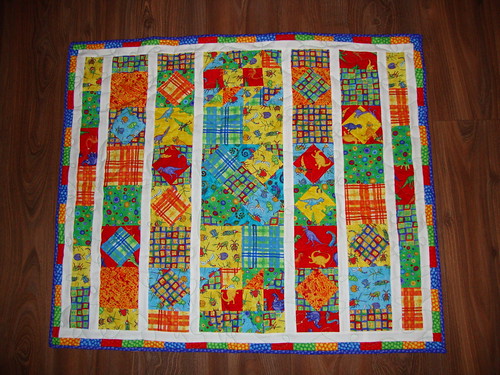
The Bright Stripes quilt has been made entirely with leftovers from the Boy's quilt, I added a narrow border as the white was just too white on its own, it really needed something else to hold it in a bit. The backing is another Robert Kaufman cotton that has been languishing in my stash for a few years which happened to match the bright colours of the quilt very nicely. And there was one purple fat quarter left from the pack which was just enough to use as binding.
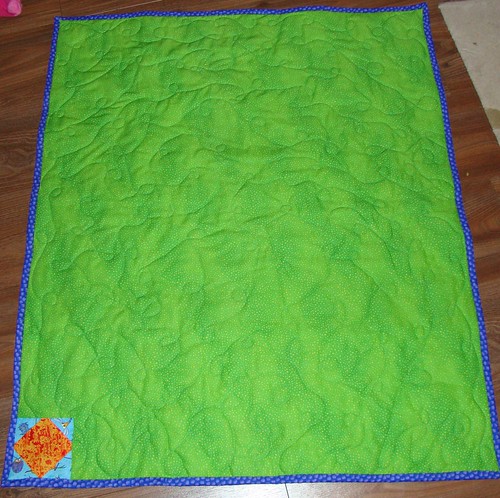
I tried a kind of loopy quilting on this one, I need to work on my technique a lot. Here's the back, I had one leftover square that I used as a label.
I quilted it with an all over stipple, took ages!! It's backed and bound with a Robert Kaufman cotton I've had in my stash for a very long time, a pretty lavender shaded check.
And here is a close up of my favourite of the fussy cut fairies I put at the corners.
The Bright Stripes quilt has been made entirely with leftovers from the Boy's quilt, I added a narrow border as the white was just too white on its own, it really needed something else to hold it in a bit. The backing is another Robert Kaufman cotton that has been languishing in my stash for a few years which happened to match the bright colours of the quilt very nicely. And there was one purple fat quarter left from the pack which was just enough to use as binding.
I tried a kind of loopy quilting on this one, I need to work on my technique a lot. Here's the back, I had one leftover square that I used as a label.
Saturday, 5 December 2009
A little more quilting
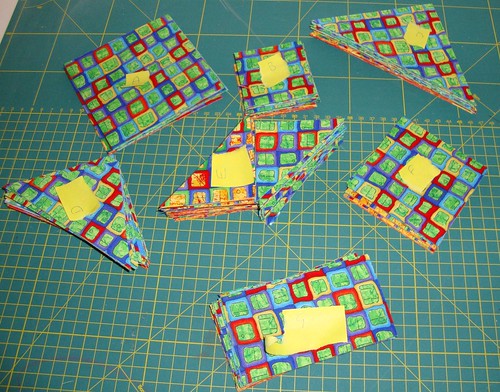
Bit of a catch up post this one, sorry for all the pics! The Boy's quilt top is almost done, here are the last three blocks:

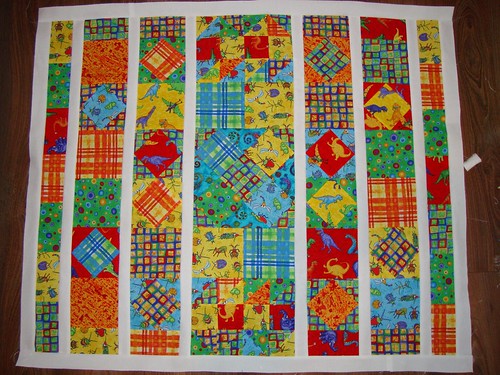
And here it is with the sashing and inner borders in place - it looks a bit bumpy here, I've since taken off and shortened two of the borders which has fixed it and left it laying much flatter.

I have four co-ordinating FQ's left which I'm going to put on as a piano key border, it is getting there!
There were quite a few scraps left over from this so I made a baby quilt which will be gifted to one of Hubby's work colleagues who has recently had a baby boy. It needs something else as a border, I haven't decided what. I didn't have a pattern for this one, I just pieced the leftovers together and made strips while trying to keep some degree of symmetry.
Another of Hubby's colleagues has had a baby girl in the last week (they're just popping them out over there lol!) so he asked me to make a quilt for her too. I have just the right thing to use, this FQ pack which I was given last Christmas.
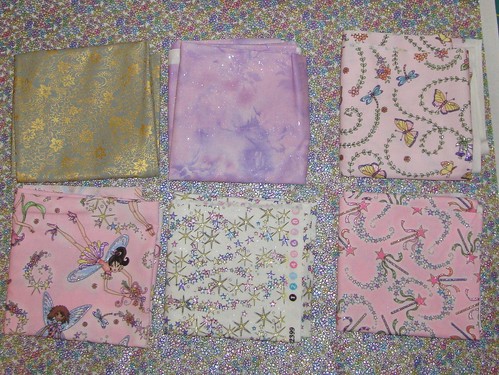
All lovely soft, glittery pastel colours just perfect for a baby quilt. I felt like a break from triangles so chose a simpler pattern from another of my secret santa books, the centre panel is a simple rail fence:
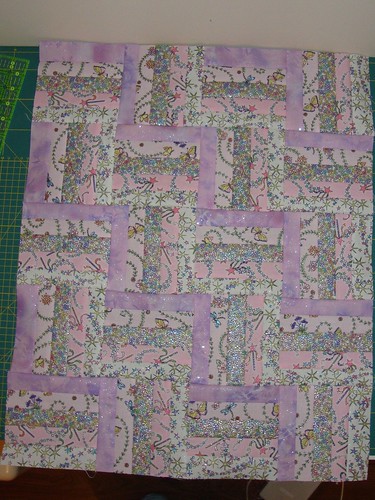
Then it has a plain solid inner border and the rest of the rail fence blocks make up the outer border along with four fussy cut fairies for the outer corners.
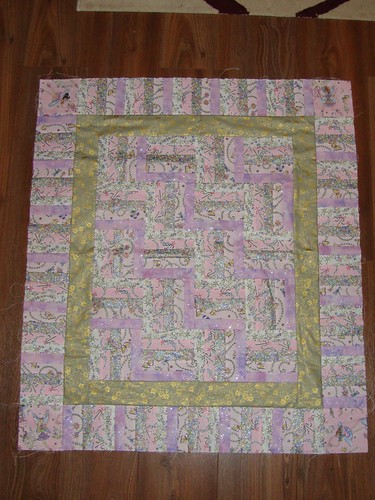
I'm not sure what to use for the backing and binding, I'm sure something will show up though, it's not like I'm short of fabric in this place lol!
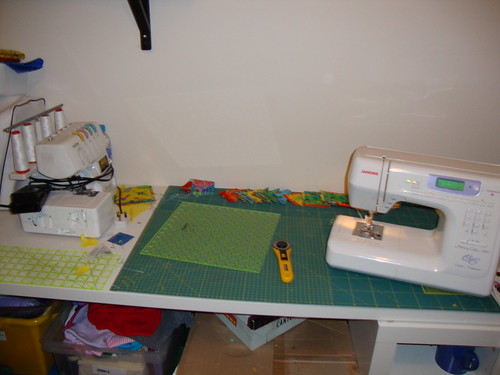
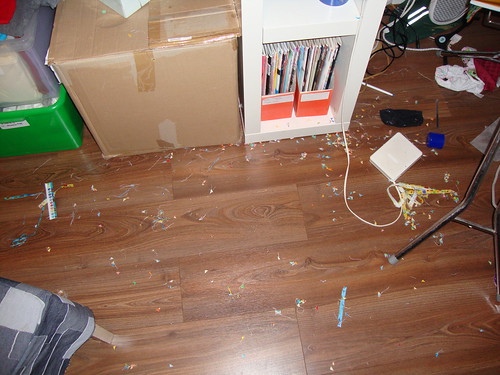
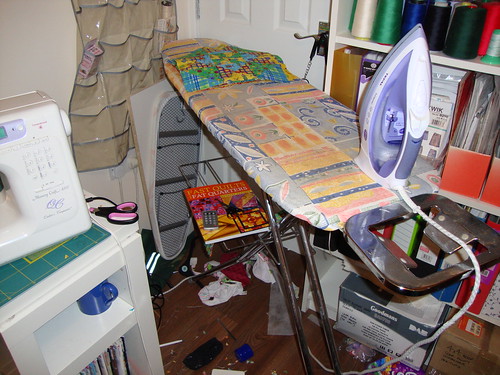
And just a final few pics to show you how tough on my sewing space piecing all these quilts have been!
Hard at work on my increasingly messy desk
Snip, snip, snip....I've been finding trimmed triangle points all over the house!
My ironing space, in front of the shoe cupboard which has been out of bounds for over a week.
Okay, that's it, all I've been up to for this time :)
And here it is with the sashing and inner borders in place - it looks a bit bumpy here, I've since taken off and shortened two of the borders which has fixed it and left it laying much flatter.
I have four co-ordinating FQ's left which I'm going to put on as a piano key border, it is getting there!
There were quite a few scraps left over from this so I made a baby quilt which will be gifted to one of Hubby's work colleagues who has recently had a baby boy. It needs something else as a border, I haven't decided what. I didn't have a pattern for this one, I just pieced the leftovers together and made strips while trying to keep some degree of symmetry.
Another of Hubby's colleagues has had a baby girl in the last week (they're just popping them out over there lol!) so he asked me to make a quilt for her too. I have just the right thing to use, this FQ pack which I was given last Christmas.
All lovely soft, glittery pastel colours just perfect for a baby quilt. I felt like a break from triangles so chose a simpler pattern from another of my secret santa books, the centre panel is a simple rail fence:
Then it has a plain solid inner border and the rest of the rail fence blocks make up the outer border along with four fussy cut fairies for the outer corners.
I'm not sure what to use for the backing and binding, I'm sure something will show up though, it's not like I'm short of fabric in this place lol!
And just a final few pics to show you how tough on my sewing space piecing all these quilts have been!
Hard at work on my increasingly messy desk
Snip, snip, snip....I've been finding trimmed triangle points all over the house!
My ironing space, in front of the shoe cupboard which has been out of bounds for over a week.
Okay, that's it, all I've been up to for this time :)
Friday, 27 November 2009
A Christmas quilt
Last Christmas I made snuggle quilts for my middle girls and my son was a bit upset when he didn't get one too. My youngest two children are away visiting grandma which has given me plenty of time today to finally get started on his quilt which, fingers crossed, I will actually finish in time for Christmas!
I had trouble deciding on fabrics for this and eventually settled on a fat quarter pack I found on ebay, Moda's Dinosaur Uproar range. Here they are, all folded nicely.
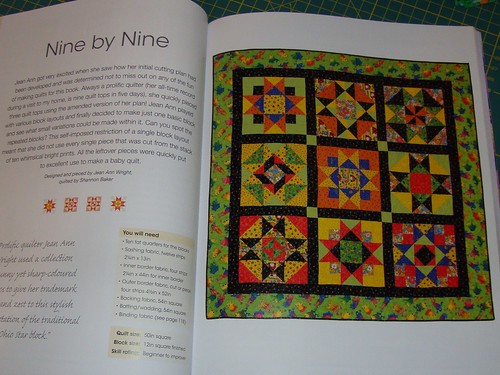
Next I had to pick a pattern. My vast prior quilting experience (three doll quilts and my girl's lap quilts!) has been a case of winging it, I decided it was past time I actually opened one of the qulting books I got from my Secret Santa last year and lo and behold, there was the perfect pattern!
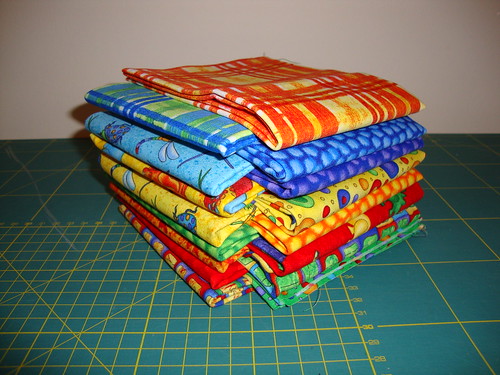
The book is Fast Quilts from Fat Quarters but I must say that, so far, it hasn't been particularly fast lol! The first step was to select ten of my delicious fabrics and cut them all up as per the book's cutting plan. I actually used the bottle of spray starch that I picked up about three years ago and apart from the funny smell I liked it, it made the fabrics a lot easier to handle. Here they are, all cut and stacked ready to piece into the blocks.
After working on and off for about five hours I've finished six of the nine blocks. I'd still be going now if I hadn't come across a slight hitch. The design uses more of triangle D than the plan lets you cut from 10 fat quarters, I'm going to have to either piece lots of little triangles into bigger ones or butcher my large squares. I vote for butchering!
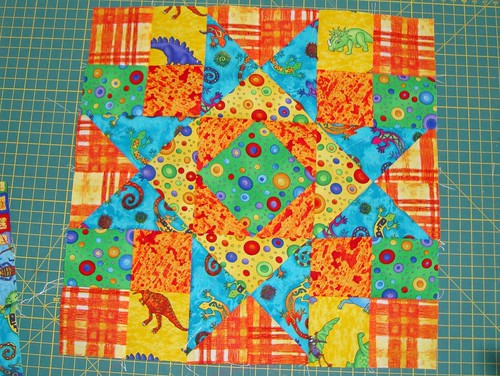
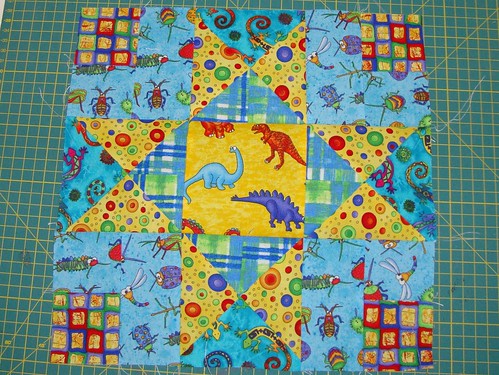
Here are the six finished blocks, they're all slight variations on an Ohio Star block and will be 12" square when it's all finished.
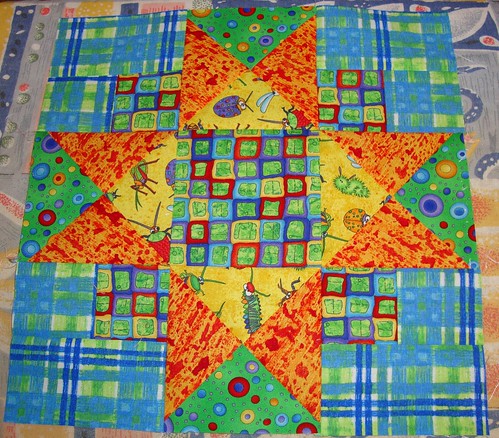
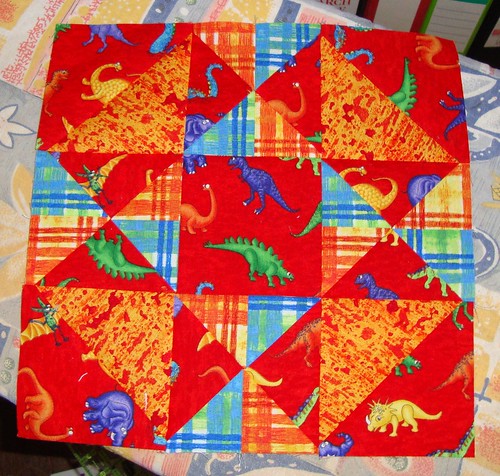
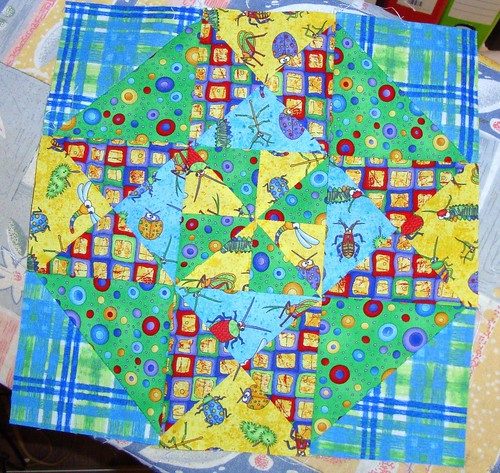
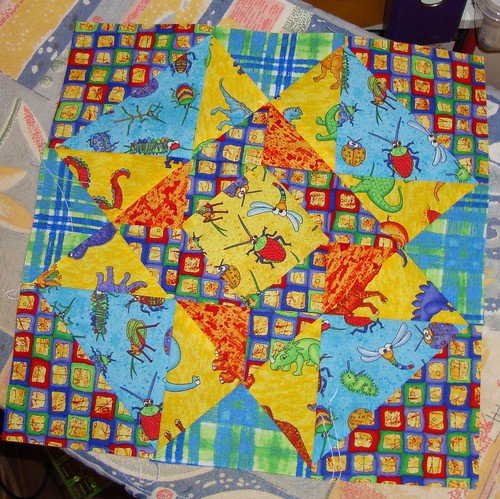
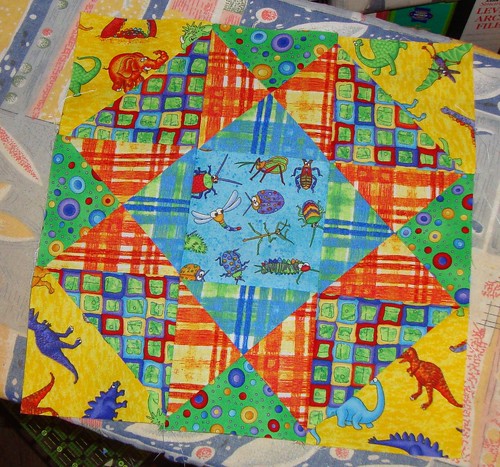
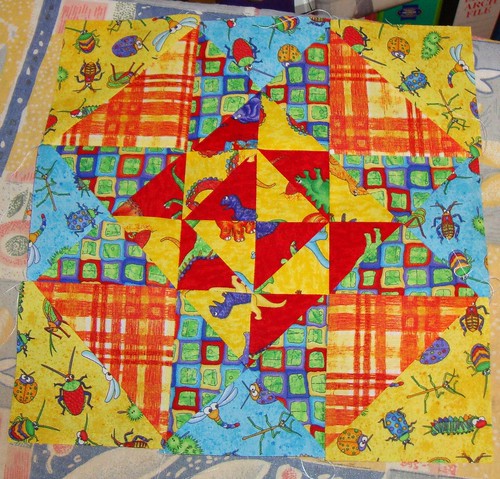
What do you think? I'm pretty pleased with these so far, I've finally cracked the "scant quarter inch" idea and my seams are matching up much better as a result!
I had trouble deciding on fabrics for this and eventually settled on a fat quarter pack I found on ebay, Moda's Dinosaur Uproar range. Here they are, all folded nicely.
Next I had to pick a pattern. My vast prior quilting experience (three doll quilts and my girl's lap quilts!) has been a case of winging it, I decided it was past time I actually opened one of the qulting books I got from my Secret Santa last year and lo and behold, there was the perfect pattern!
The book is Fast Quilts from Fat Quarters but I must say that, so far, it hasn't been particularly fast lol! The first step was to select ten of my delicious fabrics and cut them all up as per the book's cutting plan. I actually used the bottle of spray starch that I picked up about three years ago and apart from the funny smell I liked it, it made the fabrics a lot easier to handle. Here they are, all cut and stacked ready to piece into the blocks.
After working on and off for about five hours I've finished six of the nine blocks. I'd still be going now if I hadn't come across a slight hitch. The design uses more of triangle D than the plan lets you cut from 10 fat quarters, I'm going to have to either piece lots of little triangles into bigger ones or butcher my large squares. I vote for butchering!
Here are the six finished blocks, they're all slight variations on an Ohio Star block and will be 12" square when it's all finished.
What do you think? I'm pretty pleased with these so far, I've finally cracked the "scant quarter inch" idea and my seams are matching up much better as a result!
Thursday, 26 November 2009
Any excuse not to sew cushions....
Nighties! My oldest daughter has seriously outgrown the last lot of nighties I made her so it was about time she got some new ones. Ottobre pattern again, Winter 2009 #36 in a size 122cm. It's a size up from what she needs but the raglan design is very forgiving (they would have looked ridiculously wide with regular shoulders) and the length came out perfectly, it falls to just on her ankle. We'll get a few years out of these! I made six in two hours today. How do you make six nighties in two hours? Like this.

Cut everything out then press all of the neckbands and cuffs in half, decide you can live with everything being serged in white thread and stitch all the neck/cuff piece into circles in one go - no stopping to snip threads, just chain piece them. When they're all done trim the threads, press them again and quarter mark the neckbands so they're ready for attaching.
Stitch and press all of the raglan seams. The pattern instructions specify lapped seams for this but honestly, I couldn't be bothered setting up the coverstitch :) Stitching a regular seam works just as well. It helps if you quarter mark the neckline now as the neckbands go on next.
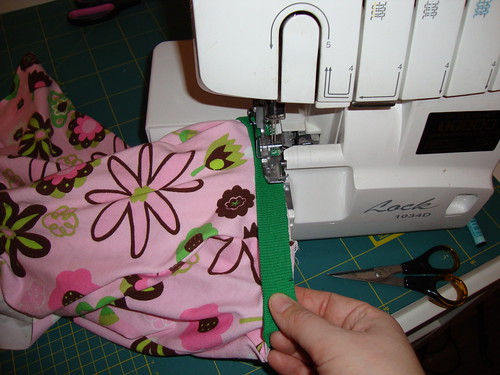
Attach the neckbands. I never pin for this, I just stretch the ribbing till the next quarter mark is lined up and then hold it in place while serging. Works for me!
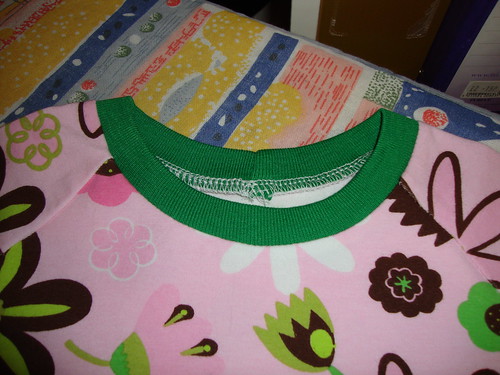
Press the neckband when you're done - optional, but doesn't it look prettier when you do? I had an issue with the neckband size on this pattern, the first one I made I swear the neckband piece was the exact same length as the neckline - not a good idea! It was very floppy and also very narrow, not at all how it looked in the magazine photo. I re cut it, taking 2.75" off of the length and making it 2" wide and it looks much better.
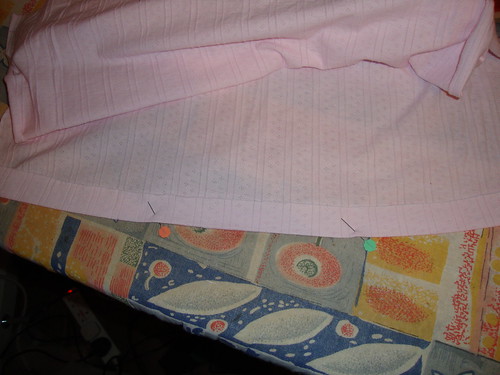
I also press and pin the bottom hems just now, before sewing the side seams. I don't stitch them yet, just get them ready.
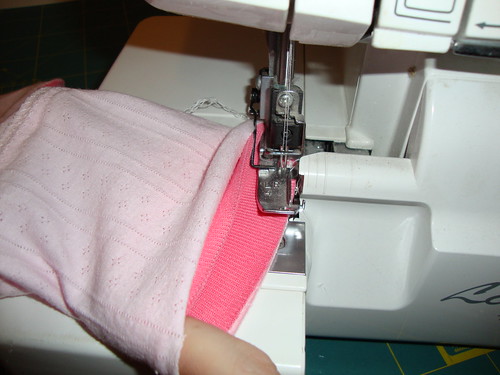
After sewing all of the side and sleeve seams and trying to ignore the hideous noises coming from your poor overworked, under-serviced serger (or is that just mine? I really must take the time to give it some TLC) it's time to put on all of the cuffs. The sleeve opening was too narrow to fit easily over my serger free arm so instead I place the cuff inside the sleeve, right sides together, and carefully serge it on like the inside of a teacup, stretching the ribbing to fit the opening. Again, once it's done, I press it. (You would be forgive for thinking I have an iron fetish at this point, I do press things rather a lot when I sew. In my defence, this is pretty much the only time anything sees an iron in our house. Honestly, if I didn't sew I don't think I would own one!)

All that's left now is to stitch those already pressed and pinned hems and Ta Da! All of a sudden you have six finished nighties (yes, there are only five in the photo. She pinched one to wear straight away despite it not being near bedtime when I was done!). I like to use a triple zigzag for hems on knit fabrics, my girl likes to sit and stretch out them hems with her feet and this is the only stitch I've found that doesn't instantly pop.
There you go! That's it for today. I'm off to see what else I can find to do other than more cushion covers....
Cut everything out then press all of the neckbands and cuffs in half, decide you can live with everything being serged in white thread and stitch all the neck/cuff piece into circles in one go - no stopping to snip threads, just chain piece them. When they're all done trim the threads, press them again and quarter mark the neckbands so they're ready for attaching.
Stitch and press all of the raglan seams. The pattern instructions specify lapped seams for this but honestly, I couldn't be bothered setting up the coverstitch :) Stitching a regular seam works just as well. It helps if you quarter mark the neckline now as the neckbands go on next.
Attach the neckbands. I never pin for this, I just stretch the ribbing till the next quarter mark is lined up and then hold it in place while serging. Works for me!
Press the neckband when you're done - optional, but doesn't it look prettier when you do? I had an issue with the neckband size on this pattern, the first one I made I swear the neckband piece was the exact same length as the neckline - not a good idea! It was very floppy and also very narrow, not at all how it looked in the magazine photo. I re cut it, taking 2.75" off of the length and making it 2" wide and it looks much better.
I also press and pin the bottom hems just now, before sewing the side seams. I don't stitch them yet, just get them ready.
After sewing all of the side and sleeve seams and trying to ignore the hideous noises coming from your poor overworked, under-serviced serger (or is that just mine? I really must take the time to give it some TLC) it's time to put on all of the cuffs. The sleeve opening was too narrow to fit easily over my serger free arm so instead I place the cuff inside the sleeve, right sides together, and carefully serge it on like the inside of a teacup, stretching the ribbing to fit the opening. Again, once it's done, I press it. (You would be forgive for thinking I have an iron fetish at this point, I do press things rather a lot when I sew. In my defence, this is pretty much the only time anything sees an iron in our house. Honestly, if I didn't sew I don't think I would own one!)
All that's left now is to stitch those already pressed and pinned hems and Ta Da! All of a sudden you have six finished nighties (yes, there are only five in the photo. She pinched one to wear straight away despite it not being near bedtime when I was done!). I like to use a triple zigzag for hems on knit fabrics, my girl likes to sit and stretch out them hems with her feet and this is the only stitch I've found that doesn't instantly pop.
There you go! That's it for today. I'm off to see what else I can find to do other than more cushion covers....
A gift for my niece
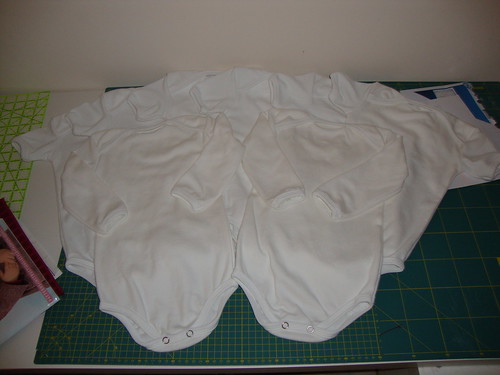
My gorgeous little niece has just outgrown her vests. Desperately needing a break from recovering caravan cushions I jumped at the chance to sew her some new ones. The pattern is from Ottobre Winter 2006 issue, pattern #1. I made six with short sleeves and two with long, they will hopefully fit her! The fabrics were from stash, I am finally out of plain white interlock though I have rather a lot of ivory still to use up.
Hello blogland and a work in progress..

Hello out there :) I wanted somewhere I could post about my sewing projects in a bit more detail so here we are, I have joined the craft blog bandwagon! This is my current work in progress (WIP). I have a good friend who recently bought a caravan. An old, well used caravan. She didn't really take to the idea of sleeping on someone else's sweat and dirt stained cushions but not to worry! I have a handy dandy sewing machine and agreed to recover them for her.
This is one of the original cushions, note the lovely dated fabric. We've chosen a dark red checked fabric to recover them with, four are done with around ten to go. It is Boring :)
Subscribe to:
Posts (Atom)